Setting Up Your First Node.js Application Step-by-Step
Full-stack developer with a good foundation in frontend, now specializing in backend development. Passionate about building efficient, scalable systems and continuously sharpening my problem-solving skills. Always learning, always evolving.
You install Node.js, open a terminal, type node, and suddenly you are running JavaScript without a browser. For many developers, that moment feels slightly confusing. Where is the HTML? What is actually executing this code? That confusion is normal because Node changes the mental model of how JavaScript runs.
This guide builds that mental model step by step and keeps things grounded in how Node actually works.
1. Installing Node.js
Before installing anything, understand what you are installing.
Node.js is a runtime environment that executes JavaScript using the V8 engine outside the browser. (Wikipedia) That means:
No DOM
No
windowDirect access to the file system, network, and OS APIs
Ability to build servers and CLI tools
How to install (OS-neutral)
The correct approach is consistent across platforms:
Go to the official Node.js website
Download the LTS (Long-Term Support) version
Run the installer or use a version manager
The official download page provides both LTS and current releases, with LTS recommended for stability. (Node.js)
A more maintainable approach is using a version manager like nvm, which lets you switch Node versions without breaking your system. (npm Docs)
What actually happens during installation
Node runtime is installed
npm(package manager) is installed alongside itSystem PATH is updated so you can run
nodeglobally
2. Checking Installation Using Terminal
Once installed, verify it immediately. This step prevents debugging phantom issues later.
Commands
node -v
npm -v
These commands check whether Node and npm are correctly installed. (npm Docs)
Expected output
v24.15.0
10.x.x
The exact version will differ, but:
node -vconfirms the runtime is availablenpm -vconfirms package management works
If these fail, your PATH is likely misconfigured.
3. Understanding Node REPL
REPL stands for:
Read → Evaluate → Print → Loop
Node provides an interactive environment where you can execute JavaScript line by line.
Start REPL
node
Example session
> 2 + 2
4

> const name = "Mohammad"
undefined

> name
'Mohammad'
The REPL:
Reads your input
Evaluates it as JavaScript
Prints the result
Waits for the next command
This behavior is defined by Node’s REPL system, which processes input and outputs results interactively. (Node.js)
Why REPL matters
Use it for:
Quick experiments
Testing small snippets
Understanding APIs without writing files
Think of it as a debugging sandbox.
4. Creating Your First JavaScript File
Now move from experimentation to actual execution.
Create a file
touch app.js
Or manually create app.js in your editor.
Minimal script
console.log("Hello from Node.js");
Naming conventions
.jsis standardKeep filenames descriptive
Avoid spaces or special characters
Nothing magical here. It is just JavaScript.
5. Running Script Using Node Command
This is where Node becomes real.
Run the file
node app.js
Output
Hello from Node.js
What is happening under the hood
Node reads your file
V8 compiles JavaScript to machine code
Code executes in a Node runtime environment
Output is sent to stdout (your terminal)
Node is not “interpreting” like a browser console. It is executing JavaScript through a runtime that includes system-level capabilities.
Saving a file and running node filename.js is the standard way to execute Node programs. (W3Schools)
6. Writing a Hello World Server
Now you move from scripts to something closer to real backend work.
Node includes a built-in HTTP module. No frameworks needed.
Minimal server
const { createServer } = require('node:http');

const hostname = '127.0.0.1';
const port = 3000;

const server = createServer((req, res) => {
  res.statusCode = 200;
  res.setHeader('Content-Type', 'text/plain');
  res.end('Hello World');
});

server.listen(port, hostname, () => {
  console.log(`Server running at http://\({hostname}:\){port}/`);
});
This example comes directly from official Node documentation. (Node.js)
Run it
node server.js
What happens internally
Node creates an HTTP server
It starts listening on port 3000
When a request comes in:
A callback executes
Response is constructed
Data is sent back
Node does not create a thread per request. It uses an event-driven model with non-blocking I/O, allowing many connections efficiently. (Node.js)
Access it
Open your browser:
http://127.0.0.1:3000
You will see:
Hello World
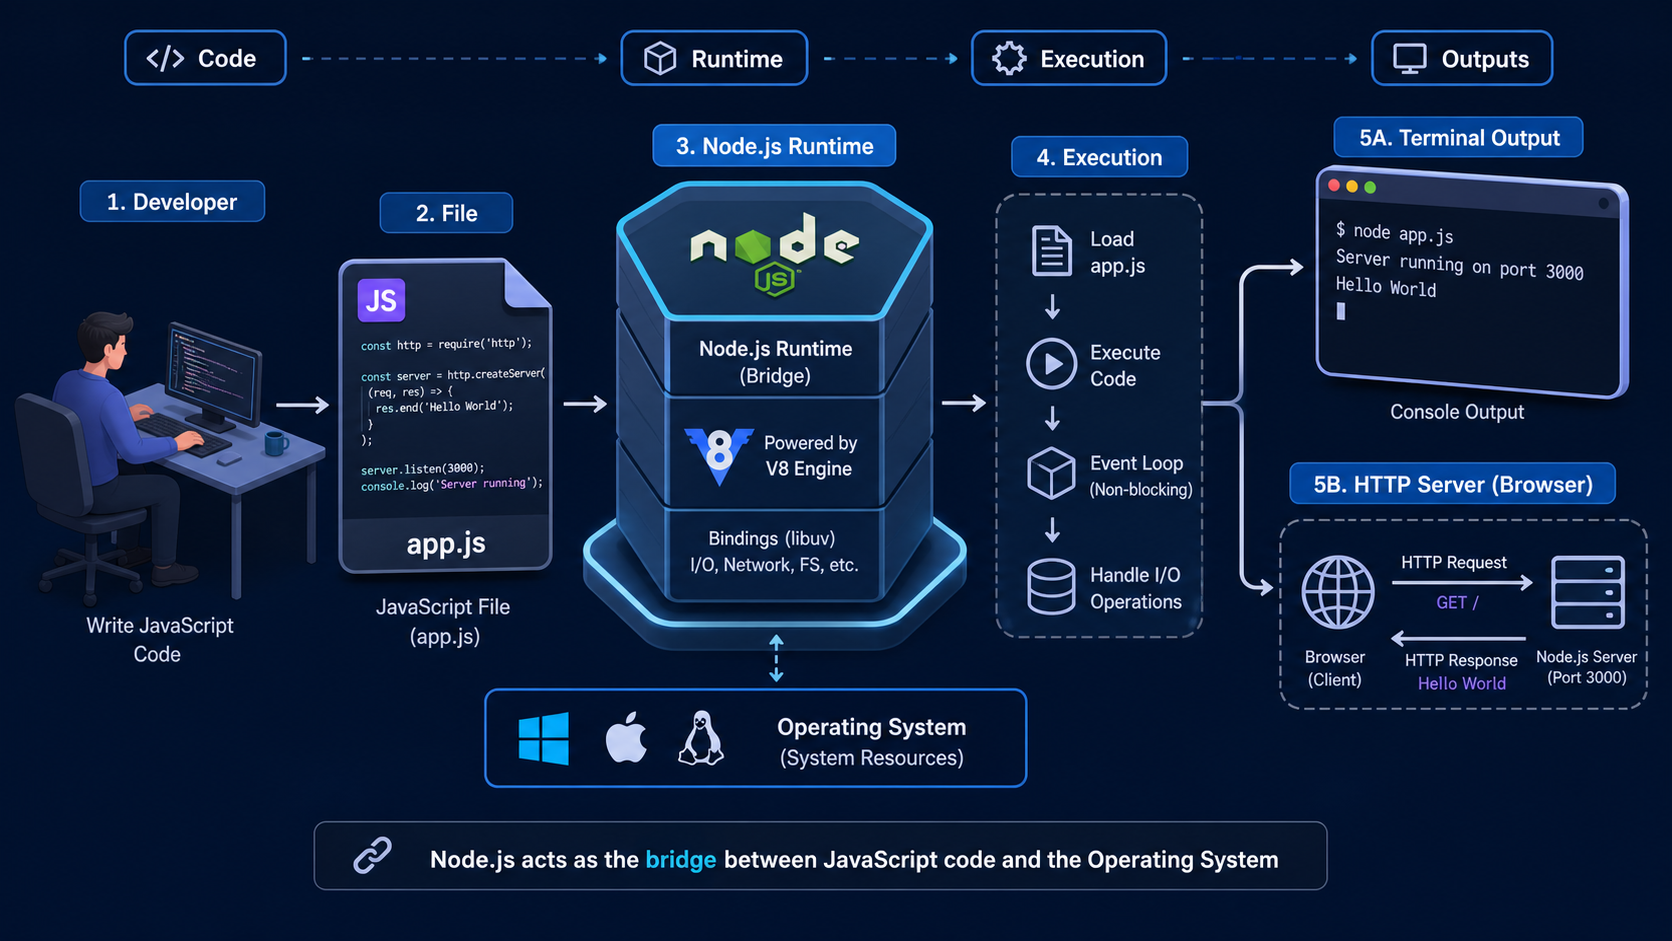
Diagram: Node Execution Flow
Visualize this pipeline:
[ app.js file ]
        ↓
[ Node Runtime (V8 Engine) ]
        ↓
[ Execution of JavaScript ]
        ↓
[ Output printed in terminal ]
Key idea: Node is the execution environment replacing the browser.
Diagram: Script → Runtime → Output
Developer writes code
        ↓
File saved (app.js)
        ↓
node app.js
        ↓
Node loads and executes code
        ↓
Terminal shows result
Key idea: Node bridges your code and the operating system.
Final Thoughts
The mistake beginners make is treating Node like “JavaScript but different.” That leads to confusion.
A better mental model:
JavaScript is the language
Node is the runtime
The runtime defines what APIs you get
Once you understand that:
REPL is just interactive execution
node file.jsis batch executionHTTP module is just another API exposed by the runtime
That foundation matters more than any framework you will use later.


